
The folks over at L’Oréal Professionel launched The Royal Wedding Collection 2012 which included some gorgeous hairstyles to act as the ‘finishing touch’ to the Indian bride’s wedding day look. They even explain how they created each look, which I find so interesting. Are any of you going to try recreating something similar? Send us a picture if you do! 😉

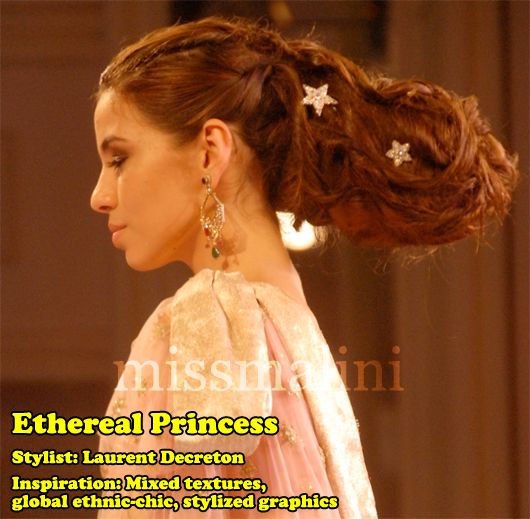
How: The hair was first blow-dried to smoothen it, post which a 5 cm circle was drawn at the level of the occipital and backcombed. This hair was wrapped with a small stuffing and fixed. Three larger stuffings at the base of the hair were used to create volume at the back. The stuffing was then covered with hair taken from around the base. Square sections of hair were then taken from around the base, were back-combed and twisted to create locks that were spray-fixed on the three large hair stuffings. The same process was repeated at the back. At the front, a middle parting was created and the same process of creating locks was followed. The finished hair was set in place with hairspray. Star shaped crystal embellishments completed the bridal look.
Stylist’s tip: “Make sure that the base of each lock is perfectly smooth to get a glossy finish with ultra shine. I added stars for a graphic break, and to illuminate the bride like a princess.”

How: After blow-drying hair into soft curls, Zenobia pulled back the hair in two tight high ponytails. Working at the back first, one of them was divided into 4 sections that were then back-combed and moulded to form twists of hair that gave a sculpted look. The process was repeated on the front section of the hair, and moulded to give a classic finish.
Stylist’s tip: “This look suits chiseled or square faces because the hair is pulled back and piled up. Avoid too many accessories and keep it simple, using Indian accessories innovatively.”

How: After creating big curls with curling tongs, five equal sized ponytails were made starting from right to left. Then each pony tail was divided into two, slightly back-combed, smoothened and curled on the sides of the ponytail. The process was repeated on the remaining pony tails.
Stylist’s tip: “You can work this look from day to night by adding a few accessories to the hair.”

How to: The hair was crimped and brushed, and a stuffing added off centre. All the hair was then twisted into an asymmetric shape on the stuffing.
Stylist’s tip: “This works beautifully for fine hair because crimping adds a lot of volume. It will suit most face types, because of its asymmetry. You can add accessories that soften the look.”

How to: The entire hair was curled with tongs and then sectioned from behind one ear right upto the other ear, from below the crown area. An off centre ponytail was created at the back, and a donut shaped stuffing was placed around the pony tail and secured well. The hair from the ponytail was wrapped around the donut stuffing. A centre parting was taken in the front, and the hair was dressed over the donut, in the direction of the movement.
Stylist’s tip: “Looks beautiful with cocktail dresses, and you can add some glitter in the parting for a modern take on the sindoor. For a round face, you can keep the sides more flat, and give it more height.”